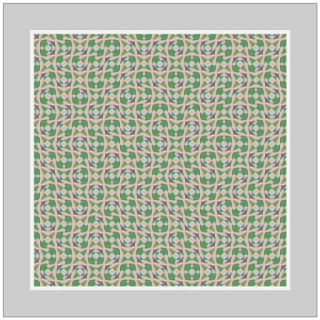
Exploring Truchet Tiling: Simple Tiles, Complex Patterns
Truchet Tiling is a fascinating technique that allows you to generate intricate patterns using simple designs and straightforward algorithms.
In this article, I will introduce the concept of Truchet Tiling, demonstrate how to design your own tiles, and provide example code to help you start creating your own generative patterns.
Let’s dive into the world of Truchet Tiling using p5.js and Processing.
What is a Truchet Pattern?
A Truchet Tiling is a pattern constructed from Truchet Tiles—square tiles that lack rotational symmetry. By arranging these tiles in different orientations, you can create a vast array of complex visual structures.
Wikipedia : Truchet tiles
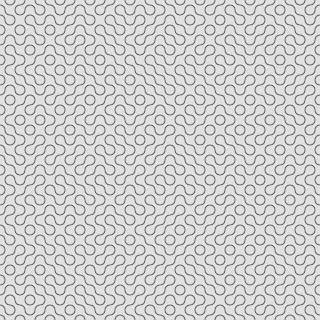
To better understand this, let's look at some concrete examples. You may have encountered patterns like this before:
This is a 10 x 10 matrix created by tiling.
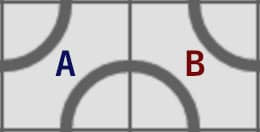
In this example, tile 'A' is our base design, while 'B' is simply 'A' rotated by 90 degrees.
By randomly rotating a single tile design across a grid, you can generate a surprisingly diverse pattern.
p5.js Implementation
Here is a basic example of Truchet Tiling implemented in p5.js.
/*
 * Truchet Tiling example code.
 * p5.js
 * @author @deconbatch
 * @version 0.1
 * Feb 28, 2022
 * license CC0
 */

const w = 640;
const h = w;
const num = 10;

function setup() {
  createCanvas(w, h);
  imageMode(CENTER);

  const cell = getPattern(floor(w / num));

  background(224);
  for (let x = 0; x < num; x++) {
    for (let y = 0; y < num; y++) {
      push();
      translate((x + 0.5) * w / num, (y + 0.5) * height / num);
      if (random(1.0) < 0.5) {
        rotate(HALF_PI);
      }
      image(cell, 0, 0);
      pop();
    }
  }
}

function getPattern(_size) {
  g = createGraphics(_size, _size);
  g.background(224);
  g.noFill();
  g.stroke(96);
  g.strokeWeight(_size * 0.1);
  g.circle(0, 0, _size);
  g.circle(_size, _size, _size);
  return g;
}
Designing Your Own Tiles
The real magic happens when you start designing your own tiles.
The Secret to Seamless Connections
While any non-rotationally symmetric design works by definition, not every design produces a cohesive pattern.
If your design is arbitrary, the lines will often look disconnected and fragmented.
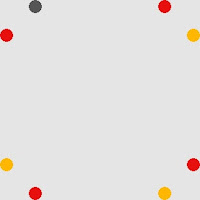
To create fluid, continuous paths, you need to ensure that the connection points on all four sides align perfectly when the tile is rotated.
How to create a seamless design:
1. Plot connection points on one side of the square.
2. Copy and rotate these points by 90 degrees to the remaining three sides.
3. Mirror or flip the paths to ensure the design remains non-rotationally symmetric.
Finally, draw lines or curves connecting these points. Don't be afraid to experiment with hand-drawn designs!
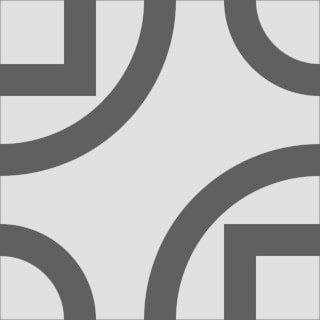
And I made a pattern with it.
Let's play with the tile of your own design.
You can make a pattern with the tile of your own design using the example code I showed before. All you need to do is change the 'getPattern()' function.
If you want to use hand drawn designed tile, you can use the 'loadImage()' not 'getPattern()' function. Don't forget to resize the tile image to fit the size of the cell.
For example.
let img;
function preload() {
  img = loadImage('ptn.jpg');
}

function setup() {
  createCanvas(w, h);
  imageMode(CENTER);

  const cell = img.resize(floor(w / num), floor(w / num));
Going Further with Processing
In this final example, I used the bezier() function to design the tile. Instead of simple rotation, I used horizontal and vertical flips (scaling by -1) to avoid gaps that can sometimes occur if the center axis of a rotated image shifts even slightly.
Example Code (Processing):
hope you find this technique as inspiring as I do. Please feel free to use and adapt this code under the GPL. I would be honored to see what kind of patterns you create!
/**
 * Magic Carpet Ride.
 * auto pattern generated Truchet Tiling.
 *
 * @author @deconbatch
 * @version 0.1
 * @license GPL Version 3 http://www.gnu.org/licenses/
 * Processing 3.5.3
 * Feb 28, 2022
 */

void setup() {

  size(900, 900);
  colorMode(HSB, 360, 100, 100, 100);
  imageMode(CENTER);

  int   frmMax  = 3;
  int   divBase = 15;
  int   start   = floor(random(frmMax));
  float hueBase = random(360.0);

  for (int frmCnt = 0; frmCnt < frmMax; frmCnt++) {

    int div = divBase + ((start + frmCnt) % frmMax) * 5;
    float hueVal = hueBase + frmCnt * 120.0;

    PImage cell = getPattern(floor(width / div), hueVal);
    background(hueVal % 360.0, 5.0, 80.0, 100.0);
    for (int x = 0; x < div; x++) {
      for (int y = 0; y < div; y++) {
        pushMatrix();
        translate((x + 0.5) * width * 1.0 / div, (y + 0.5) * height * 1.0 / div);
        //  rotate(floor(random(4.0)) * HALF_PI);
        if (random(1.0) < 0.5) {
          scale(-1.0, 1.0);
        }
        if (random(1.0) < 0.5) {
          scale(1.0, -1.0);
        }
        image(cell, 0, 0);
        popMatrix();
      }
    }

    casing(100);
    saveFrame("frames/" + String.format("%04d", frmCnt + 1) + ".png");

  }

  exit();

}

/**
 * getPattern : returns random generated pattern
 */
PImage getPattern(int _size, float _hue) {
  // connect points
  PVector[][] points = {
    {new PVector(0.0, 0.5), new PVector(0.5, 1.0)},
    {new PVector(0.5, 0.0), new PVector(1.0, 0.5)},
    {new PVector(0.0, 0.25), new PVector(0.25, 0.0)},
    {new PVector(0.75, 1.0), new PVector(1.0, 0.75)},
    {new PVector(0.75, 0.0), new PVector(1.0, 0.25)},
    {new PVector(0.0, 0.75), new PVector(0.25, 1.0)},
  };
  int pNum = points.length;

  PGraphics g = createGraphics(_size, _size);

  g.beginDraw();
  g.colorMode(HSB, 360, 100, 100, 100);
  g.blendMode(BLEND);
  g.background(_hue % 360.0, 5.0, 80.0, 100.0);
  g.noStroke();
  for (int i = 0; i < pNum; i++) {
    PVector[] p = points[i];
    float hueVal = (_hue + i * 30.0) % 360;
    float pRnd = random(0.1, 0.9);
    g.fill(hueVal, 40, 60, 100);
    g.bezier(
             p[0].x * _size, p[0].y * _size,
             pRnd * _size, pRnd * _size,
             (1.0 - pRnd) * _size, (1.0 - pRnd) * _size,
             p[1].x * _size, p[1].y * _size
             );
  }
  g.endDraw();

  return g;

}

/**
 * casing : draw fancy casing
 */
public void casing(int _m) {
  fill(0.0, 0.0);

  strokeWeight(_m * 2 - 10.0);
  stroke(0.0, 0.0, 95.0, 100.0);
  rect(0.0, 0.0, width, height);

  strokeWeight(_m * 2 - 32.0);
  stroke(0.0, 0.0, 80.0, 100.0);
  rect(0.0, 0.0, width, height);

  strokeWeight(20.0);
  stroke(0.0, 0.0, 50.0, 100.0);
  rect(0.0, 0.0, width, height);

  strokeWeight(16.0);
  stroke(0.0, 0.0, 100.0, 100.0);
  rect(0.0, 0.0, width, height);
}


